แสดงบทความที่มีป้ายกำกับ windows แสดงบทความทั้งหมด

วันจันทร์ที่ 28 เมษายน พ.ศ. 2557

Convert VDI to VMDK & Open Sun VirtualBox Virtual Machine in VMware Player & Workstation


Convert VDI to VMDK & Open Sun VirtualBox Virtual Machine in VMware Player & Workstation


vdi-to-vmdkThis post explains how to convert vdi to vmdk and open Sun VirtualBox virtual machine in to VMware workstation or VMplayer 3. As you are aware, Virtual Box uses VDI as hard disk file and VMware uses VMDK.  Opening VMDK in VirtualBox is very straight forward since VirtualBox supports VMDK. But opening VDI files in VMware workstation or VMware player is not possible, because VMware doesn’t support VDI files.
After I wrote steps to convert VMDK to VDI and How to open VMDK files in Sun VirtualBox, I wanted to try converting VDI to VMDK. When I googled , found only few steps   work with Linux or Mac environment and didn’t work for me in Windows.
Found the two following posts in google first page, but both did not work for me. I’m sure it wouldn’t have worked for others too.
So, after several attempts, here are the steps worked for me in converting VDI to VMDK in Windows environment and allowed to open VirtualBox virtual machine in VMware Workstation and player.
Before convert VDI to VMDK, make sure to delete snapshots in VirtualBox. Because each snapshot keeps different hard disk files separately from major disk file. So if you convert the major VDI file to VMDK then you will get the first version of virtual machine before any snapshots. There for we have to merge all snapshots to major disk file to get the latest virtual machine in VMware. By deleting snapshots you can merge all snapshot hard disks to main hard disk file.

Steps to Convert VDI to VMDK

1) Convert VDI file to RAW format by Vboxmanage command.
Vboxmanage internalcommands converttoraw >

VDI to VMDK
In this example I have WinXP.vdi at G:\VirtualBox location. You must add path to Windows OS to work thisvboxmanage and qemu-img commands.  Read more about setting up these commands paths in Windows which is explained in VMDK to VDI.
2) Once RAW disk is created, now we can convert RAW to VMDK. For this conversion you need third partysoftware QEMU Manager for Windows which can be download here.
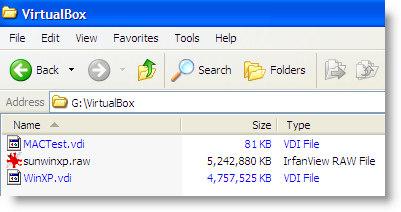
VDI to VMDK
3) After installed QEMU Manager for Windows, start the conversion of RAW to VMDK by following command.
Qemu-img convert -O vmdk
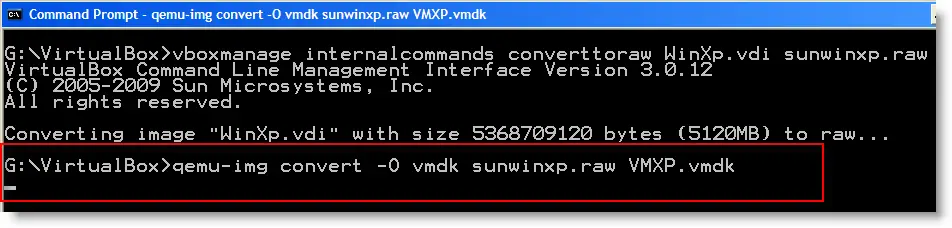
VDI to VMDK
4) VMDK file will be stored at the location you specified in command. This VMDK file is containing the samedata which VirtualBox VDI file had.
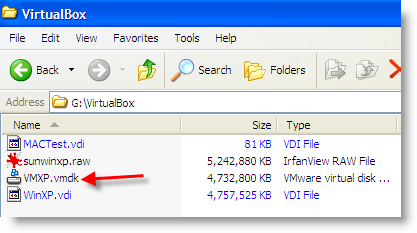
VDI to VMDK
5) Now we will import this VMDK file in to VMware Player 3 and run the same virtual machine which was running in Sun VirtualBox.
When people wanted to change virtual machines between VirtualBox and VMware, they try to convert VMX to XML or XML to VMX. It’s wrong.  You cannot convert virtual machines by converting these files. VMX is a virtual machine configuration file on VMware and XML is for Sun VirtualBox. We must convert the hard disk files (VMDK or VDI) to be able to swap virtual machines.
Then how about VMX and XML? We have to create them. When you create virtual machines in VMware or VirtualBox it creates theses configuration files automatically. So do not waste your time to convert VMX to XML or XML to VMX.
6) To import converted VMDK files to VMware player, just create a new Windows XP virtual machine. You have to create same OS of VDI file. In this example I converted Windows XP VirtualBox virtual machine.  I’m assuming that you know the steps to create Windows XP virtual machine in VMware Player 3, so I’m not going to explain it.
Before start the virtual machine, remove the newly added hard disk during the creation and add the converted VMDK ( VMXP.vmdk) as a hard disk.
7) That’s it. Play the virtual machine. Now, you must be able to see the same Sun VirtualBox virtual machine in VMware Player. You may have to allow drivers installation, because VMware and Sun VirtualBox desktopvirtualization software are totally different.
Remove VirtualBox additions if it’s installed and install VMware tools.
I’m attaching the screen shots of same virtual machine in Sun VirtualBox and VMware Player 3.
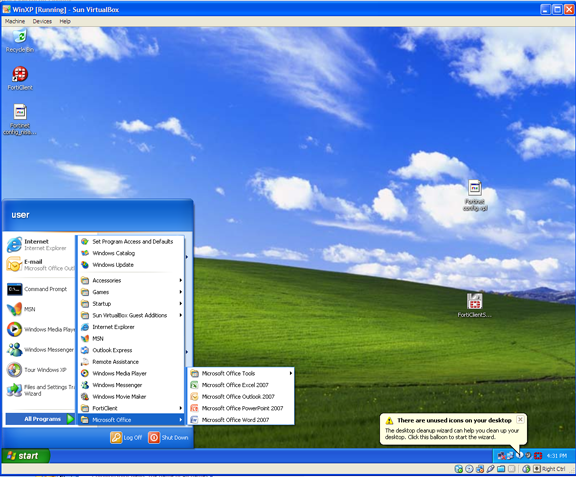
VDI to VMDK
VDI to VMDK desktop virtualization
This method not only to transfer virtual machines to VMware from VirtualBox, but also to access VirtualBox VDI files in VMware products.
The similar method can be used to convert VDI to VMDK and open in VMware Workstation.
I hope this post will be useful to convert VirtualBox VDI files to VMware VMDK files in Windows environment and transfer virtual machines between top desktop virtualization software.
Let me know if you face any problem on this VDI to VMDK conversion.

Download Windows Server 2012 R2 VHD and Run It on VirtualBox or VMware Workstation


Download Windows Server 2012 R2 VHD and Run It on VirtualBox or VMware Workstation

Do you want to try Windows server 2012 R2 VHD on VirtualBox or VMware?, this guide is for you. Using pre installed virtual hard disks always ease our job by avoiding ISO download, installation and configuration. You can find out more information about download link of Windows 2012 R2 server VHD and how to attach it to VirtualBox or VMware in this guide.
R2 version has come up with several major changes. Hyper-V hypervisor has been improved well with few great features. They called that ‘Start Button is back’, but believe me, it’s not. The start menu/button icon is useless in this version.
Each aspect of server functions have been improved significantly in 2012 R2. You can find out them all inMicrosoft Site here.
If you want to know the included changes in Windows 2012 R2 Hyper-V hypervisor, refer this nice presentation here.

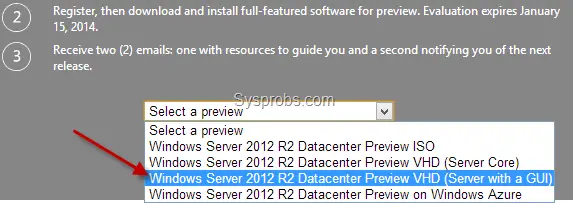
Download Windows 2012 R2 VHD

Download page
2) Extract the exe file you have downloaded. Since this is made for Hyper-v server to import directly, you will find more files and folders inside it.
We need the VHD file only which resides inside ‘Virtual Hard Disks’ folder.

How to Run Windows Server 2012 R2 VHD on VirtualBox.

3) You must have latest version of VirtualBox. VirtualBox supports Windows 8.1 (2012 R2) from 4.2.16 version only. Better upgrade to latest version, otherwise you might get an error message says ‘Your PC needs to restart’ in black screen.
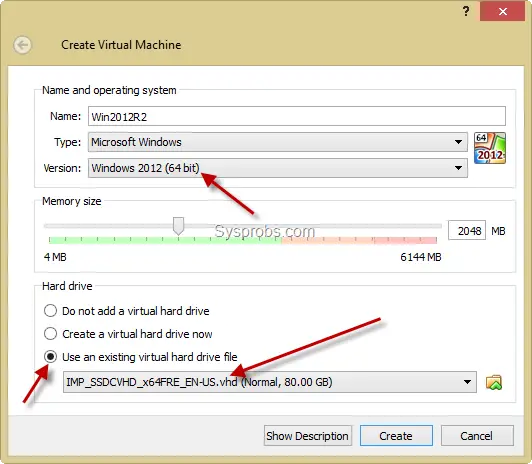
4) Create a new virtual machine. Select Windows 2012(64bit) as client OS.
Instead of creating new hard disk, select existing virtual hard drive option. Browse the extracted VHD file which is located inside ‘Virtual Hard Disks’ folder.
2012 R2 VM in Virtualbox
5) There should not be any issue once you have started virtual machine.
Administrator password is R2Preview! , as of now. You could find more information here from Microsoft site.
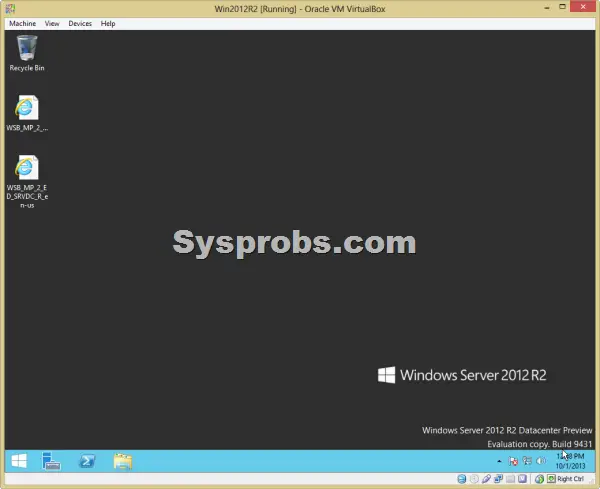
Here is the working virtual machine on VirtualBox.
working 2012 R2 on VirtualBox

How to Use Windows Server 2012 R2 VHD in VMware Workstation.

6) VMware workstation or VM Player do not support VHD disk files for direct import. Therefore, VHD file needs to converted to VMDK format. There are few free tools available for this purpose in Windows OS platform.
WinImage is a tool (free for 30 days) can be used to convert VHD to VMDK in Windows 8 or 7. Also, StarWind’s V2V converter is available for free after registration.
Download WinImage here. It’s a small application.
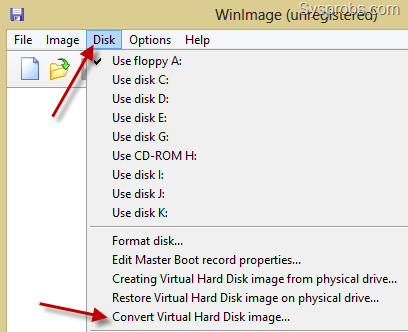
From Disk menu select ‘Convert Virtual Hard Disk image’. Browse the VHD file you need to convert and select default option in next screen to make fixed size volume.
WinImage converter
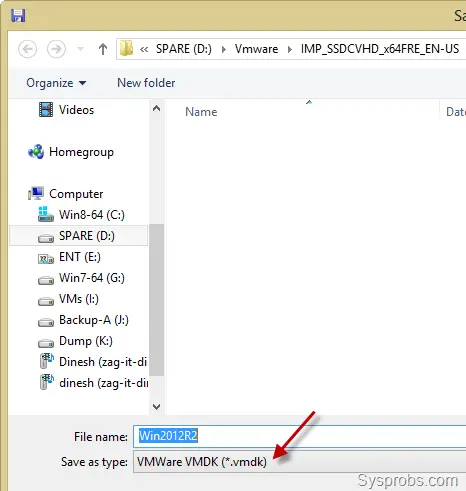
In the saving dialogue box, select VMDK file format from drop down and press save. This will start the conversion process of VHD to VMDK.
save as vmdk
If you want to know more about how to use WinImage for this process, refer this guide.
7) Once the disk has been converted successfully, create a new virtual machine in VMware workstation.
Select ‘I will install OS later’ option because we are not going to install OS.
Os later
8.)  Select Windows Server 2012 as guest OS.
Windows 2012 server guest os in vmware
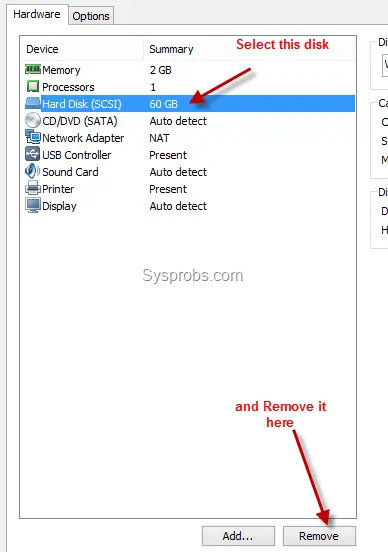
9) Once the new VM is created successfully, follow below step to delete default vmdk file.
removed vmdk file
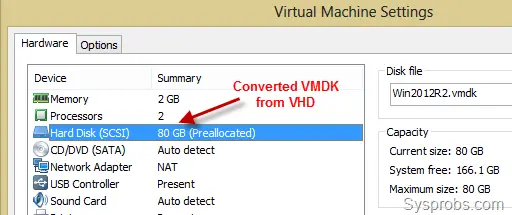
After deleting, let’s attach our Windows server 2012 R2 VMDK file which was converted from original VHD.
Press Add and select hard drive. Make sure to select existing disk option as shown below.
existing disk option
Browse and attach the converted 2012 R2 VMDK file.
attached vmdk
10) You can modify other hardware settings ( such as RAM and processor cores) if you wish. Then power on the virtual machine.
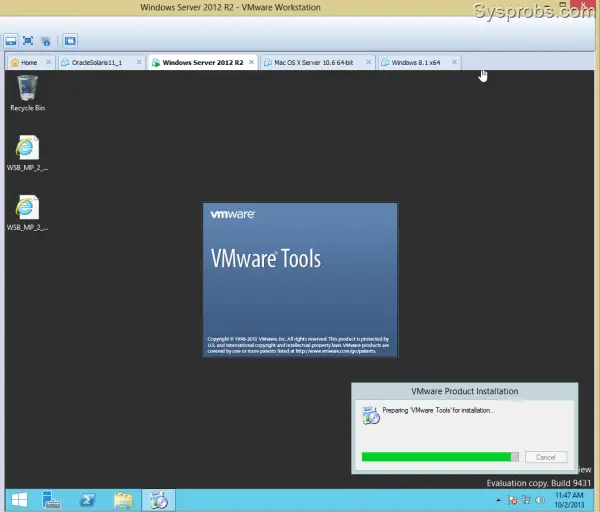
I’m sure it will start smoothly. VMware tools for Windows 2012 R2 also works fine in VMware workstation 10. I could able to install and use few extra features such as full screen, unity mode and improved display performance.
windows server 2012 R2 VHD on Vmware
By using this method, you can use same VMDK (which converted from original Windows server 2012 R2 VHD) on VMware ESXi or vSphere hypervisor hosts.
Share your experience about these steps to install and run Windows server 2012 R2 VHD on VirtualBox or VMware workstation.

Disk2vhd v2.01


Disk2vhd v2.01

By Mark Russinovich and Bryce Cogswell
Published: January 21, 2014
Rate:  

Introduction

Disk2vhd is a utility that creates VHD (Virtual Hard Disk - Microsoft's Virtual Machine disk format) versions of physical disks for use in Microsoft Virtual PC or Microsoft Hyper-V virtual machines (VMs). The difference between Disk2vhd and other physical-to-virtual tools is that you can run Disk2vhd on a system that’s online. Disk2vhd uses Windows' Volume Snapshot capability, introduced in Windows XP, to create consistent point-in-time snapshots of the volumes you want to include in a conversion. You can even have Disk2vhd create the VHDs on local volumes, even ones being converted (though performance is better when the VHD is on a disk different than ones being converted).
The Disk2vhd user interface lists the volumes present on the system:
Disk2vhd
It will create one VHD for each disk on which selected volumes reside. It preserves the partitioning information of the disk, but only copies the data contents for volumes on the disk that are selected. This enables you to capture just system volumes and exclude data volumes, for example.
Note: Virtual PC supports a maximum virtual disk size of 127GB. If you create a VHD from a larger disk it will not be accessible from a Virtual PC VM.
To use VHDs produced by Disk2vhd, create a VM with the desired characteristics and add the VHDs to the VM's configuration as IDE disks. On first boot, a VM booting a captured copy of Windows will detect the VM's hardware and automatically install drivers, if present in the image. If the required drivers are not present, install them via the Virtual PC or Hyper-V integration components. You can also attach to VHDs using the Windows 7 or Windows Server 2008 R2 Disk Management or Diskpart utilities.
Note: do not attach to VHDs on the same system on which you created them if you plan on booting from them. If you do so, Windows will assign the VHD a new disk signature to avoid a collision with the signature of the VHD’s source disk. Windows references disks in the boot configuration database (BCD) by disk signature, so when that happens Windows booted in a VM will fail to locate the boot disk.
Disk2vhd runs Windows XP SP2, Windows Server 2003 SP1, and higher, including x64 systems.
Here's a screenshot of a copy of a Windows Server 2008 R2 Hyper-V system running in a virtual machine on top of the system it was made from:

(click image to zoom)

Command Line Usage

Disk2vhd includes command-line options that enable you to script the creation of VHDs. Specify the volumes you want included in a snapshot by drive letter (e.g. c:) or use "*" to include all volumes.
Usage: disk2vhd <[drive: [drive:]...]|[*]>
Example: disk2vhd * c:\vhd\snapshot.vhd
Note: Physical-to-virtual hard drive migration of a Windows installation is a valid function for customers with Software Assurance and full retail copies of Windows XP, Windows Vista, and Windows 7. Software Assurance provides users valuable benefits—please contact Microsoft Corporation for further information. Windows XP, Windows Vista and Windows 7 installed by Original Equipment Manufacturers (OEM) using OEM versions of these products may not be transferred to a virtual hard drive in accordance with Microsoft licensing terms.

Download

Free Microsoft VHD Download-Exchange Server 2010/2007 SP1 VHD and More


Free Microsoft VHD Download-Exchange Server 2010/2007 SP1 VHD and More


Microsoft is providing excellent test drive program for major Server Operating Systems and Enterprise Applications by providing free VHD files download. These pre installed and configured working OS and Applications are available for testing/evaluating purpose for Hyper-V servers. VHD (Virtual Hard Disk) files can be downloaded from official site and just imported to Hyper-V server virtualization software. The latest and famous Exchange 2010 SP1 for Windows 2008, System Center Configuration Manager v.Next on Windows Server 2008 R2, Exchange 2007 and more VHD files are available for download.
Obviously these products are for testing and evaluating purpose only,which work maximum 180 days. Once you import these VHD files to Hyper-V server then you will get a fully functional server with main application. This helps in saving the time and internet bandwidth by not downloading the OS, Application and configuring them.
Free Microsoft VHD Download
Though Microsoft Virtual PC supports VHD files but these server versions can’t be used with MS Virtual PC desktop virtualization software in normal PC. These pre configured Operating Systems and Applications require mostly 64 Bit processor and hardware virtualization enabled computers. More over, these VHD files are created specifically for Microsoft Hyper –V or Windows Virtual Server R2 server virtualization products.

Interested Free Microsoft VHD Download ( for Hyper – V Server)


For Windows Virtual Server R2


I’m thinking to convert one of these above VHD file to VMDK and run it in VMware workstation or VMware ESXi server. It’s just for fun and testing purpose, also if you already have a testing lab in VMware ESXi, then installing one more testing environment in Hyper-V is a difficult and unnecessary job. I will update my experiment later in this blog.
You can use this great opportunity to work with latest MS OS and Applications for 180 days (6 months) for free by downloading these pre configured VHD files.  Keep an eye on specific Microsoft site for future updates, I’m sure they will allow more new and updated Server OS and Applications there.
http://www.sysprobs.com/free-microsoft-vhd-download-exchange-server-2010-2007-sp1-vhd

วันอังคารที่ 13 ธันวาคม พ.ศ. 2554

การปรับปรุงประสิทธิภาพการทำงานให้ดีขึ้น

เราทราบดีว่าไม่มีใครชอบรอนานๆ ด้วยเหตุนี้ เราจึงออกแบบ Windows 7 ให้ทำงานได้อย่างว่องไว มีประสิทธิภาพ และพร้อมเสมอ การปรับปรุงประสิทธิภาพที่สำคัญ ได้แก่

เข้าสู่โหมดสลีปและกลับมาทำงานต่อ

Windows 7 ได้รับการออกแบบมาให้เข้าสู่โหมดสลีป กลับมาทำงานต่อ และเชื่อมต่อกับเครือข่ายไร้สายของคุณใหม่ได้อย่างรวดเร็วยิ่งขึ้น ดังนั้นพีซีของคุณจึงพร้อมสำหรับคุณเสมอ

การค้นหา

เมื่อคุณกำลังค้นหาอะไรบางอย่าง คุณต้องการคำตอบ ไม่ใช่ความล่าช้า ใน Windows 7 ผลลัพธ์การค้นหาจะแสดงผลได้เร็วกว่าเดิม การเรียงลำดับและการจัดกลุ่มผลลัพธ์การค้นหาก็ทำได้รวดเร็วขึ้นมากเช่นกัน

อุปกรณ์ USB

เมื่อคุณเสียบแฟลชไดรฟ์แบบพกพาหรืออุปกรณ์ USB อื่นๆ เป็นครั้งแรก Windows 7 มักจะสามารถทำให้อุปกรณ์ดังกล่าวพร้อมใช้งานได้ในเวลาไม่กี่วินาที และถ้าคุณเคยใช้อุปกรณ์นั้นมาก่อน ระยะเวลาในการรอก็จะยิ่งสั้นลง

การใช้หน่วยความจำที่ดีขึ้น

Windows 7 มีความสามารถปรับแต่งฟังก์ชันการทำงานที่สามารถเพิ่มความเร็วและประสิทธิภาพ โดยรวมของพีซีของคุณได้ ซึ่งใช้หน่วยความจำน้อยลงเมื่อไม่มีการใช้งานและหน่วยความจำภาพน้อยลงเมื่อ เปิดใช้งานและสลับเปลี่ยนหน้าต่าง นอกาจากนี้ ยังออกแบบมาเพื่อเรียกใช้บริการในพื้นหลังเช่น Bluetooth เฉพาะเมื่อคุณต้องการใช้งานเท่านั้น
หากหน่วยความจำเหลือน้อย ReadyBoost สามารถเร่งความเร็วคอมพิวเตอร์ของคุณได้โดยใช้เนื้อที่เก็บข้อมูลใน USB แฟลชไดรฟ์และการ์ดหน่วยความจำแฟลชส่วนใหญ่

การแก้ไขปัญหาโดยการบู๊ตแบบ clean boot จาก Windows 7

ขั้นตอนที่ 1: ทำการบู๊ตแบบ clean boot

หมายเหตุ หากคอมพิวเตอร์ต่ออยู่กับเครือข่าย ค่านโยบายเครือข่ายอาจทำให้คุณไม่สามารถดำเนินขั้นตอนเหล่านี้ได้ แนะนำว่าไม่ควรใช้ยูทิลิตี้ System Configuration อย่างยิ่งเพื่อปรับแต่งตัวเลือกในการบู๊ตขั้นสูงในคอมพิวเตอร์ ยกเว้นวิศวกรให้บริการของ Microsoft จะแจ้งให้ดำเนินการในส่วนนี้ การดำเนินการดังกล่าวอาจทำให้ไม่สามารถใช้งานคอมพิวเตอร์ได้
  1. ล็อกออนเข้าในคอมพิวเตอร์โดยใช้บัญชีที่มีสิทธิ์ผู้ดูแลระบบ
  2. คลิก Start
     จากปุ่ม Start
    พิมพ์ msconfig.exe ในช่อง Start Search จากนั้นกด ENTER เพื่อเริ่มยูทิลิตี้ System Configuration
    User Account Control permission
    หากคุณได้รับแจ้งขอรหัสผ่านผู้ดูแลระบบหรือขอการยืนยันรหัส ให้พิมพ์รหัสผ่านของคุณ หรือคลิก Continue
  3. จากแท็บ General คลิกเพื่อเลือกตัวเลือก Selective startup จากนั้นคลิกเพื่อลบเครื่องหมายที่ Load startup items (ช่อง Use Original Boot.ini ไม่สามารถใช้งานได้)
    ขยายรูปภาพนี้
  4. จากแท็บ Services คลิกเพื่อเลือก Hide all Microsoft services จากนั้นคลิก Disable all
    ขยายรูปภาพนี้

    หมายเหตุ ขั้นตอนต่อไปนี้ช่วยให้ส่วนให้บริกาของ Microsoft สามารถดำเนินการต่อไปได้ บริการเหล่านี้ครอบคลุมระบบเครือข่าย Plug and Play การบันทึกการทำงาน การรายงานข้อผิดพลาดและบริการอื่นๆ หากคุณปิดส่วนบริการเหล่านี้ คุณอาจทำการลบจุดกู้คืนข้อมูลทั้งหมดอย่างถาวร ห้ามทำตามนี้หากคุณต้องการใช้ยูทิลิตี้ System Restore ร่วมกับจุดกู้คืนข้อมูลที่มีอยู่
  5. คลิก OK จากนั้นคลิก Restart

ขั้นตอนที่ 2: เปิดใช้สว่นให้บริการครึ่งหนึ่ง

  1. ทำตามขั้นตอนที่ 1a และ 1b เพื่อเรียกใช้ยูทิลิตี้ System Configuration
  2. คลิกที่แท็บ Services จากนั้นคลิกเพื่อเลือกที่ Hide all Microsoft services
  3. คลิกเพื่อเลือกช่องทำเครื่องหมายครึ่งหนึ่งจากรายการ Service
  4. คลิก OK จากนั้นคลิก Restart

ขั้นตอนที่ 3: พิจารณาว่าปัญหาเกิดขึ้นอีกหรือไม่

หาก ยังเกิดปัญหาขึ้นอยู่ ให้ทำซ้ำขั้นตอนที่ 1 และ 2 จากขั้นตอนที่ 2 ให้คลิกเพื่อล้างเครื่องหมายในช่องครึ่งหนึ่งที่เลือกไว้ในรายการ Service

หาก ไม่เกิดปัญหาขึ้น ให้ทำซ้ำขั้นตอนที่ 1 และ 2 จากขั้นตอนที่ 2 เลือกช่องทำเครื่องหมายที่เหลือครึ่งหนึ่งของที่ไม่มีเครื่องหมายอยู่ใน รายการ Service ทำซ้ำขั้นตอนเหล่านี้จนกระทั่งเลือกช่องทำเครื่องหมายได้ทั้งหมด

หากเลือกส่วนบริการเพียงรายการเดียวในรายการ Serviceและยังพบปัญหา แสดงว่าบริการที่เลือกเป็นสาเหตุของปัญหา ไปขั้นตอนที่ 6 หากไม่มีส่วนให้บริการที่ทำให้เกิดปัญหานี้ ให้ไปขั้นตอนที่ 4

ขั้นตอนที่ 4: เปิดใช้รายการ Startup ครึ่งหนึ่ง

  1. ทำการบู๊ตแบบ clean boot โดยทวนซ้ำขั้นตอนที่ 1
  2. คลิกที่แท็บ Startup จากนั้นคลิกเพื่อเลือกช่องทำเครื่องหมายครึ่งหนึ่งจากรายการ Startup Item
  3. คลิก OK จากนั้นคลิก Restart

ขั้นตอนที่ 5: พิจารณาว่าปัญหาเกิดขึ้นอีกหรือไม่

หาก ยังเกิดปัญหาขึ้นอยู่ ให้ทำซ้ำขั้นตอนที่ 1 และ 4 จากขั้นตอนที่ 4 ให้คลิกเพื่อล้างเครื่องหมายในช่องครึ่งหนึ่งที่เลือกไว้ในรายการ Startup Item

หาก ไม่เกิดปัญหาขึ้น ให้ทำซ้ำขั้นตอนที่ 1 และ 4 จากขั้นตอนที่ 4 เลือกช่องทำเครื่องหมายที่เหลือครึ่งหนึ่งของที่ไม่มีเครื่องหมายอยู่ใน รายการ Startup Item ทำซ้ำขั้นตอนเหล่านี้จนกระทั่งเลือกช่องทำเครื่องหมายได้ทั้งหมด

หากเลือกรายการที่เริ่มการทำงานไว้เพียงรายการเดียวจาก Startup Item และยังพบปัญหา แสดงว่ารายการเริ่มการทำงานดังกล่าวเป็นสาเหตุของปัญหา ไปขั้นตอนที่ 6

หาก ไม่มีรายการเริ่มการทำงานใดที่เป็นสาเหตุของปัญหานี้ แสดงว่าส่วนให้บริการของ Microsoft อาจไม่ได้เป็นสาเหตุของปัญหา พิจารณาว่าส่วนให้บริการ Microsoft ตัวใดที่อาจเป็นสาเหตุของปัญหา โดยทวนซ้ำขั้นตอนที่ 1 และ 2 โดยไม่ทำเครื่องหมายที่ Hide all Microsoft services ในทั้งสองขั้นตอน

ขั้นตอนที่ 6: แก้ไขปัญหา

หลัง จากพบรายการเริ่มการทำงานหรือส่วนบริการที่เป็นสาเหตุของปัญหาแล้ว กรุณาติดต่อผู้พัฒนาโปรแกรมเพื่อตรวจสอบว่าจะสามารถแก้ไขปัญหาได้อย่างไร หรือเรียกใช้ยูทิลิตี้ System Configuration จากนั้นคลิกเพื่อลบเครื่องหมายสำหรับรายการที่เป็นสาเหตุของปัญหา

ขั้นตอนที่ 7: รีเซ็ตคอมพิวเตอร์เพื่อเริ่มการทำงานตามปกติ

หลังจากแก้ไขปัญหาเสร็จสิ้น ให้ทำตามขั้นตอนต่อไปนี้เพื่อรีเซ็ตคอมพิวเตอร์ให้สตาร์ทตามปกติ:
  1. คลิก Start
     จากปุ่ม Start
    พิมพ์ msconfig.exe ในช่อง Start Search จากนั้นกด ENTER

    User Access Control permission
    หากคุณได้รับแจ้งขอรหัสผ่านผู้ดูแลระบบหรือขอการยืนยันรหัส ให้พิมพ์รหัสผ่านของคุณ หรือคลิก Continue
  2. จากแท็บ General คลิกเลือก Normal Startup จากนั้นคลิก OK
  3. เมื่อได้รับแจ้งให้รีสตาร์ทเครื่อง ให้คลิกที่ Restart

การเริ่มใช้บริการ Windows Installer เมื่อไม่ได้โหลดส่วนให้บริการของระบบ

หากคุณเรียกใช้โปรแกรม Setup โดยไม่ได้เรียกใช้ส่วนบริการ Windows Installer คุณอาจได้รับข้อความแจ้งข้อผิดพลาดต่อไปนี้
The Windows Installer service could not be accessed. ติดต่อฝ่ายให้บริการเพื่อยืนยันว่ามีการลงทะเบียนส่วนให้บริการ Windows Installer ถูกต้อง
ส่วนให้บริการ Windows Installer จะไม่เริ่มขึ้นหากคุณไม่ได้ทำเครื่องหมายที่ Load system services จากยูทิลิตี้ System Configuration ใช้งานส่วนให้บริการ Windows Installer เมื่อไม่ได้โหลดส่วนให้บริการระบบโดยเรียกใช้ส่วนให้บริการด้วยตัวเอง โดยทำตามขั้นตอนต่อไปนี้
  1. คลิก Start
     จากปุ่ม Start
    คลิกขวาที่ Computer จากนั้นคลิกเลือก Manage

    User Access Control permission
    หากคุณได้รับแจ้งขอรหัสผ่านผู้ดูแลระบบหรือขอการยืนยันรหัส ให้พิมพ์รหัสผ่านของคุณ หรือคลิก Continue
  2. จากโครงสร้างคอนโซล คลิกเลือก Services and Applications จากนั้นคลิกที่ Services
  3. จากแถบแสดงรายละเอียด คลิกขวาที่ Windows Installer จากนั้นคลิกที่ Start

ปัญหาการบูตระบบช้าและการแก้ไขใน Windows 7

สำหรับผู้ใช้ Windows 7 และผู้ที่อัปเดทเป็น Service Pack 1 นั้น ขณะนี้ได้เกิดปัญหานึงในการบูตระบบ คือเมื่อใช้ไปนานๆ เข้าจะเกิดอาการที่เครื่องบูตช้าผิดปกติ  ทางไมโครซอฟต์ได้ออกมายืนยันแล้วว่าปัญหานี้เกิดจริง โดยแจ้งว่าปัญหาเกิดจากกระบวนการบูตระบบ Windows 7 และ Windows 7 SP1 เหตุเป็นเพราะปัญหาที่ระบบได้สร้างจุดคืนค่า (Restore Point) เอาไว้มากจนเกินไป ทำให้กระบวนการบูตที่ช้าไปด้วย
 ต้นต่อเกิดจากฟีเจอร์ ReadyBoot ทำงานผิดผลาดได้สร้างจุดคืนค่าเอาไว้เกินขีดจำกัดซึ่งปกติแล้วจะมีขนาดของ แต่ละจุดคืนค่าอยู่ที่ 512KB และจะถูกตรวจสอบด้วยไฟล์Volsnap.sysเมื่อมีการทำงานที่ผิดผลาด ทำให้กระบวนการบูตส่งข้อมูลกันผิดผลาด ซึ่งทำให้การบูตช้ามาก
อย่างไรก็ดีทางไมโครซอฟต์ได้แจ้งว่าปัญหาอาการหน่วงเครื่องในเวลาบูตนี้ จะพบกันมากกับคอมพิวเตอร์ที่ใช้ฮารด์ดิสก์ที่มีขนาดใหญ่ตั้งแต่ 2 TB ขึ้นไปในการทำงานของระบบ
สำหรับท่านใดที่พบปัญหานี้ สามารถดาวน์โหลด Hotfix เพื่อแก้ปัญหาได้ตามลิงค์
http://support.microsoft.com/hotfix/KBHotfix.aspx?kbnum=2555428&kbln=en-us
รายละเอียด
http://support.microsoft.com/kb/2555428

เริ่มความเร็วในการบูตให้กับ Windows 7

โดยปกติ  Windows 7 นั้นจะมีการบูตเครื่องได้เร็วมากกว่า Windows XP และ Vista อยู่แล้ว แต่ในความเป็นจริงของการทำงานของ Windows 7 เป็น OS ที่ออกแบบมาให้ใช้กับ CPU ที่มีหลายคอร์ (Core) ได้ดีมาก แต่ Windows 7 ตั้งค่าดีฟอลต์ในการบูตเข้าระบบไว้ที่ 1 Core เท่านั้น
สำหรับคุณๆ ที่ใช้ CPU แบบ Multi-Core คุณสามารถตั้งด่าให้ Windows 7 ทำการบูตเครื่องพร้อมกันมากกว่า 1 คอร์  เพื่อผลในการบูตที่เร็วที่สูงขึ้น วิธีตั้งค่ามีดังนี้…
1. พิมพ์ msconfig ลงในช่อง Search ของ Start Menu แล้วกดคีย์ Enter
2. ที่หน้าต่าง System Configuration คลิกเลือกแท็บ Boot ต่อมาให้คลิก Advanced options…
boot_01
3. ที่หน้าต่าง BOOT Advanced Options ให้คลิกใส่เครื่องหมายถูกหน้ารายการ Number of processors และเลือกจำนวน Core โดยคลิกที่ Drop Down List  ใต้รายการนี้ (แนะนำให้เลือกจำนวนมากที่สุดเท่าที่ CPU มี) เสร็จแล้วคลิกปุ่ม OK
boot_02
4. จะมีหน้าต่างเตือนให้ Restart ขึ้นมาก็ให้คลิกที่ Restart
boot_03

วันจันทร์ที่ 12 ธันวาคม พ.ศ. 2554

ตามคำขอ MySQL บน Windows Server 2008

 ที่มา http://www.sosweets.net/?p=236

ก็พยายามจะเขียนให้เสร็จเร็ว ๆ แต่ติดปัญหาตรงที่บนห้องพักไม่มีInternet ให้ใช้งาน ดังนั้นในการเขียนบทความมีความจำเป็นในการที่ต้องอาศัยการDownload Fileบางตัวมาใช้งานด้วย แถมมาเจอ ForeFront ผมเชื่อเลยว่าสมาชิกอีกหลายท่านแทบอยากจะบ๊ายบาย ไม่อยากที่จะทำอะไร ขอนั่งทำตาเหม่อก็พอ ฮาาาาาา

ครั้งที่แล้วเราสามารถติดตั้งตัวช่วยในการอ่านPHPได้เรียบร้อยไปแล้ว แม้จะมีติดขัดตรงนู้นบ้าง ตรงนี้บ้าง ก็ยังสามารถที่จะฝ่ามันไปได้(แม้จะผ่านไปได้แบบงงกับตัวเองก็ตามที) ดังนั้นครั้งนี้เราจะต้องจัดการกับการนำฐานข้อมูลมาใช้งานบ้าง ซึ่งตัวที่หลาย ๆ ท่านคงรู้จักและเคยได้ใช้งานมากันบ้างแล้วก็คือ ตัวMySQL Server ซึ่งเป็นFreeWare เป็นตัวหนึ่งที่ถือว่าประสิทธิภาพเพียงพอในงานทำพวกเว็บไซต์
ก่อนอื่นเราต้องไปหา Downloadไฟล์ติดตั้งกันมาก่อนครับ ไปที่เว็บ http://www.mysql.com/downloads/mysql/ แต่ก่อนจะเลือกการ  Download ผมแนะนำว่าควรเลือกใช้ Platfrom ให้รูปแบบตรงกับ OS

หลังจากที่ทิ้งไว้นาน วันนี้เราจะมาดำเนินการต่อนะครับ เมื่อเราDownload File MySQL เรียบร้อยก็ทำการติดตั้งด้วยการ Double Clickครับ

มาเจอหน้าจอการติดตั้ง ก็ให้คลิก  NEXT  ไปโลด

ต่อไปให้ติ๊กถูกที่ I Accept………  ก่อนจะคลิก  Next ต่อไป

เลือกรูปแบบการติดตั้งแบบ Typical แต่ใครคิดว่าเซียนพอตัวก็เลือกรูปแบบ Custom ไปได้เลยครับ

คลิกปุ่ม Install เพื่อเริ่มกระบวนการติดตั้งตามสเตปครับ

คลิก  Next เลยครับ

คลิก  Next อีกครั้งเลยครับ

กด Finish เพื่อสิ้นสุดการติดตั้ง แต่เดียวเราต้องไปทำการ Setting ระบบกันต่อไปครับ อย่าลืมติ๊กตรงหน้า Launch The MySQL…..ด้วยนะครับ

คราวนี้มาเซทค่ากันเพื่อให้ระบบสามารถทำงานได้นะครับ คลิก Next เอาฤกษ์เอาชัยกันก่อนเลยครับ

ผมเลือกรูปแบบการติดตั้งเป็นแบบ Standdard Configuration นะครับ ใครจะเลือกแบบ Detailed ก็จัดไป แต่ตั้งค่ายังไง ไม่รู้นะครับ ฮาาาาา

จัดไปตามที่ผมทำเครื่องหมายครับ คือการติดตั้ง Service ที่ต้องการใช้

ซึ่งจริง ๆ เราสามารถเลือกรูปแบบฐานข้อมูลให้เหมาะสมกับงานที่ต้องใช้ได้นะครับ ดูตามภาพเลยครับ แต่ผมเลือกเป็น MySQL เฉย ๆ เนียนๆ

ถัดมาคือ ให้เราใส่ Password เพื่อการ Login ในสิทธิ์ของ Root เวลาใส่Password ให้ใส่ 2 ครั้งให้เหมือนกันและจำให้ได้ด้วยนะครับ หุหุ

ต่อมาก็ถึงขั้นตอนการเริ่ม Excute โปรแกรม ให้ติดตั้งและตั้งค่าตามที่เรากำหนดมาก่อนหน้าครับ

อันนี้คือภาพแสดงการติดตั้งที่สำเร็จเรียบร้อยแล้วครับ กดFinish ไปซะ เป็นไงบ้างครับ การติดตั้งMySQLมันง่ายมากครับ ง่ายจนหลายคนอาจเผลอตั้งค่าผิดพลาดกันไปได้นะครับ กิกิ

ก่อนจะดีใจเกินไป เราควรทำการตรวจสอบก่อนนะครับว่า MySQL ที่เราได้ติดตั้งไป มันสามารถทำงานได้จริงหรือเปล่า วิธีการทดสอบตอนนี้เราคงต้องใช้แบบ Command Line เพราะที่จริงเราสามารถที่จะทดสอบบน PHPMyadmin ได้นะครับ แต่เนื่องจากเรายังไม่ได้ติดตั้ง PHPMyadmin (ซึ่งคาดว่าผมจะกั๊ก ไม่เขียนต่อละ ฮาๆๆ) ดังนั้นให้เราคลิกที่ปุ่ม Start -> All Programs -> MySQL -> MySQL Server 5.5 -> MySQL  5.5 Command Line Client

เมื่อปรากฏ MySQL  5.5 Command Line Client ขึ้นมา โปรแกรมจะให้เราใส่Password  ตามที่เราตั้งลงไปเลยครับ โย่วววว

การทดสอบนะครับ หลังใส่ Password ก็ให้เคาะEnter จะปรากฏบรรทัด mysql> ขึ้นมา ให้เราพิมพ์ show databases; ลงไปครับ จะได้ดังภาพเลย

แค่นี้การติดตั้งระบบ Database ด้วย MySQL ก็เสร็จสมบูรณ์ครับ